If you don’t know how to do it without Ansible, then Ansible won’t help you either.
Transfor your code to the VM
To transfer your code on the VM, you have two options: a) you clone it locally and copy it over with scp, or b) you clone the Git repository directly inside the VM. Both of those are valid procedures, so feel free to choose what fits your current situation best.
Copy with scp
Scp is a fundamental linux command that copies files between hosts on a network. The basic syntax for scp is:
scp -r -P <port> ./* <user>@<host>:/path/to/target/directory
This will copy all files and directories recursively (-r flag) from your current directory to the remote host (your VM).
The downside is that your project’s directory might include files that are only supposed to be for local usage, like .env files, static files, build output, etc.
Therefore you might want to check out your repository into a separate directory first and then copy the files from there to the remote host.
Clone from the VCS
To clone your code from a version control system (VCS) like Github you should have Git installed on your local machine and on the remote host, initialized a Git repository inside your project directory and pushed your code to the VCS. If your GitHub repository is public, you can clone it without any problems on the VM. In case your repository is private, you have two options:
- You generate a ssh private key on your VM and add it to the accepted SSH Keys in your GitHub Account. The downside is that this key will have access to any of your private repositories.
- You generate an access token in your GitHub Account and clone the repository like this:
git clone https://[email protected]/user-or-org/repoThe steps required to generate a new token are simple:- Go to Settings > Personal Access Tokens
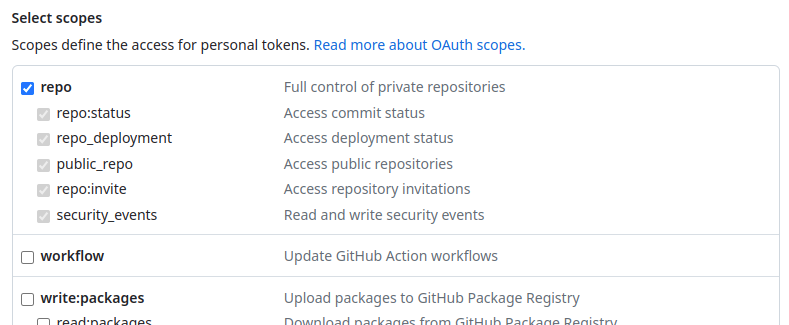
- Generate a personal access token (classic) with repo scope enabled.

- Clone like this:
git clone https://[email protected]/user-or-org/repoThis option provides you with more granular control over the permissions of your access token, especially the Fine-grained personal access tokens
🧐 Some notes on git clone
git clonehas several options, two of which I consider particularly useful:
- you can specify the tag / branch you want to checkout with the option
--branch(or-b)- you can reduce the amount of files that are cloned with
--depth 1
Set up the python environment
I assume you have already installed pyenv inside your VM. Now you can set up a virtual environment for your application with:
pyenv install 3.11.3
pyenv virtualenv 3.11.3 <name of virtual environment>
pyenv activate <name of virtual environment>
pip install -r requirements.txt
This will create a new python environment inside $PYENV_ROOT/versions/3.11.3/envs/<name of virtual environment> with your application’s requirements.
What I would suggest, and I got this from this Django Con talk in 2015 called Django Deployments Done Right, is that you name your environments according to the git commit hash of the version you want to deploy.
You can get the git hash by running git rev-parse HEAD inside your repo.
The advantage of this approach is that you always have a backup of your dependencies, in case that something goes wrong during the deployment, and you can always return to a previous version of your app.
The downside is that you have to reinstall the packages every time, on each deploy.
Feel free to decide yourself how you like to manage your dependencies.
Configure and deploy with Systemd
Now inside your app’s directory /srv/my_app/ you will need following files:
/srv/<app name>/
├── gunicorn.conf.py
├── run
└── .env
- The
gunicorn.conf.pyfile holds the gunicorn configuration. If gunicorn is executed from inside the/srv/<app name>/directory, it picks up this configuration file.import multiprocessing workers = multiprocessing.cpu_count() * 2 + 1 bind = "<ip address>:80" - The
runfile is a bash script that executes gunicorn. If the environment variablePYTHONPATHpoints to your application’s directory, you can specify the path to yourwsgi.pyas a python module path.#! /bin/bash export PYTHONPATH="/patho/to/repo/src:$PYTHONPATH" export VIRTUAL_ENV="/path/to/virtualenv" exec $VIRTUAL_ENV/bin/gunicorn project.wsgi - The
.envfile holds all your application’s environemnt variables.SECRET_KEY=... - Additionaly you also need a
<app name>.servicefile inside/etc/systemd/system/to configure systemd to run your application. Make sure to change the values accordingly where the exclamation marks are (❗)[Unit] Description=gunicorn daemon After=network.target [Service] EnvironmentFile=/srv/❗<app name>/.env WorkingDirectory=/srv/❗<app name>/ ExecStart=/srv/❗<app name>/run AmbientCapabilities=CAP_NET_BIND_SERVICE User=❗app_user Group=❗app_group [Install] WantedBy=multi-user.target
Now you can run following two commands in your shell:
sudo systemctl enable <app name>: This will start your application on boot.sudo systemctl start <app name>: This will start your application. If you have done everything correctly, your application will now be running on port 80 on your VM.- In case it does not work, you can get the logs with
journalctl -u <app name>. - After you fixed the potential error, you can restart your app with
sudo systemctl restart <app name>.
If you want to learn more about Systemd and Gunicorn, read my previous post. If you wish to automate the entire process, take a look at the next post, which explains how to use Ansible to deploy your code automatically on any remote host.
